Understanding the Magic of Pastelmat: Why Colored Pencil Artists Love this Surface
Discover how Pastelmat's unique texture allows for beautiful layering, rich colors, and techniques that are difficult to achieve on traditional colored pencil paper.
If you've ever worked with colored pencils on traditional drawing paper, you know the frustration of reaching a point where your paper simply won't accept another layer of pigment. The surface becomes slick, your pencils seem to skate across the page, and adding lighter colors over darker ones becomes nearly impossible.
Enter Pastelmat, a surface that seems to break many of the traditional rules of colored pencil drawing!
One of the things I love most about Pastelmat is its ability to accept layer after layer of colored pencil pigment while still allowing me to make adjustments along the way.
But what makes this paper so different?
The Secret Is in the Surface
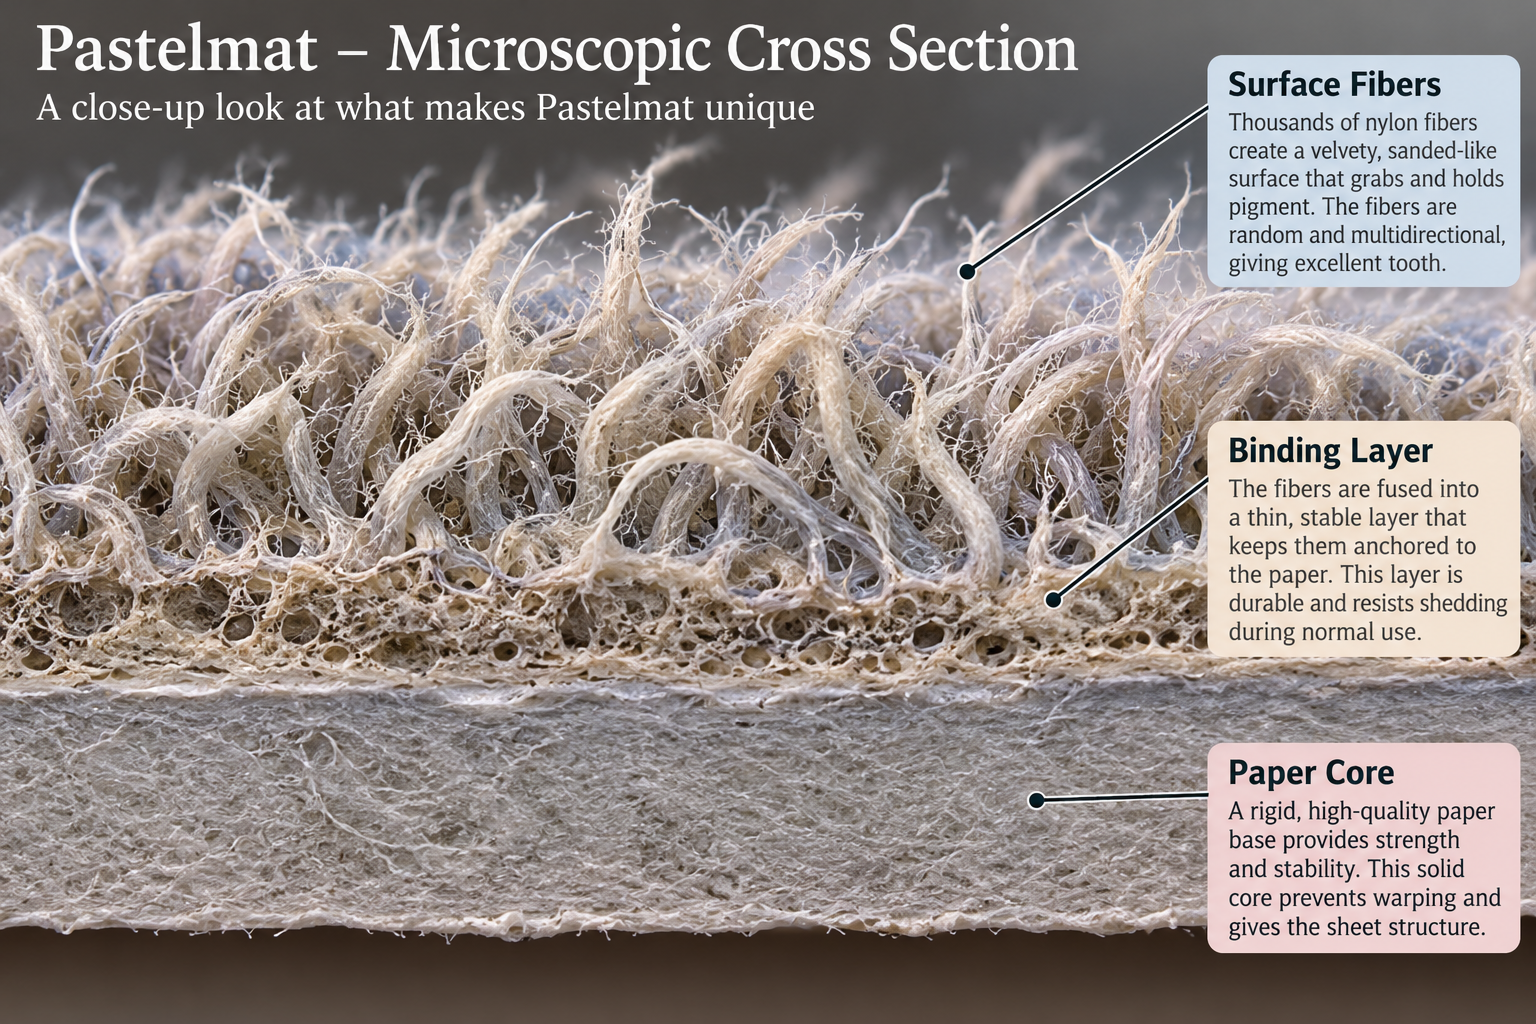
Imagine looking at a dense thicket of tangled branches and brambles. There are spaces between the branches, overlapping structures, and countless little places where something could become trapped.
That's somewhat how I visualize the surface of Pastelmat.
Unlike traditional smooth drawing paper, Pastelmat has a unique textured coating that provides an incredible amount of tooth.
In art terminology, tooth refers to the texture of a drawing surface that catches and holds pigment.
When you apply colored pencil to Pastelmat, pigment becomes lodged within the textured surface. As you continue layering, more pigment fills the tiny spaces, allowing you to build rich, complex colors.
This is why Pastelmat can accommodate so many more layers than many traditional drawing papers.
And here's where the real magic begins!
A Light Touch Goes a Long Way
One of the most important techniques to learn when working with colored pencils on Pastelmat is to use a light touch.
It can be tempting to press harder to achieve stronger color, especially when you're accustomed to working on smoother papers.
But pressing too firmly can compress the surface texture, reducing its ability to accept additional layers.
Instead, allow the texture of the paper to do the work for you.
Use gentle, controlled strokes and gradually build your color through multiple applications.
Think of it as filling all those little spaces within the surface rather than flattening them.
Remember: You can always add another layer, but restoring flattened tooth is much more difficult!
Why Does My Colored Pencil Drawing Look Faded the Next Day?
Have you ever worked on a drawing, admired the beautiful rich colors, and returned the next morning only to discover that everything looks a little lighter?
You're not imagining things!
One possible explanation is the way pigment settles into the textured surface.
When you first apply colored pencil, pigment catches on the raised portions of the tooth as well as in the spaces between them.
As pigment becomes distributed within the texture, more of the unfilled surface may become visible, giving the appearance of faded color.
This doesn't mean your drawing is ruined or that your colored pencils are losing their color overnight.
The solution is often simply more layers!
Continue building your colors with a light touch, allowing additional pigment to fill the remaining texture.
With patience, you'll notice your colors becoming richer, smoother, and more saturated.
Lighting changes can also affect how a drawing looks from one day to the next, so try evaluating your work under consistent lighting.
Yes, You Can Layer Light Colors Over Dark Colors!
This is probably one of my favorite features of Pastelmat.
On many traditional colored pencil papers, once you've established a dark area, adding a lighter color over the top can be frustrating.
Pastelmat changes that experience.
Because its textured surface can continue accepting pigment, lighter colored pencils can often be layered successfully over darker colors.
Imagine drawing a black cat and then adding delicate white whiskers.
Or creating sunlight catching the tips of dark green leaves.
Or adding bright highlights to a deeply shadowed flower petal.
These effects are much easier to achieve when your drawing surface continues to hold new pigment.
Of course, the opacity of your particular colored pencils matters, and results will vary depending on how heavily you've already layered.
But Pastelmat opens up wonderful possibilities for working from dark to light!
Keep Those Colored Pencils Sharp!
Here's a simple tip that makes a tremendous difference when working on Pastelmat:
Sharpen your pencils frequently.
A sharp pencil point can reach farther into the tiny recesses of the textured surface.
A dull pencil tends to glide over the higher portions of the tooth, sometimes leaving tiny specks of the underlying paper visible.
Keeping your pencils sharp helps you:
• Deposit pigment more effectively into the texture.
• Achieve more even color coverage.
• Create crisp edges and fine details.
• Build richer colors with less pressure.
You don't necessarily need a needle-sharp point for every stroke, but maintaining a reasonably sharp pencil makes layering much easier.
Try Using a Paintbrush to Blend Your Colored Pencils
Here's a technique you might not have considered.
A small, clean, dry soft paintbrush can be a useful tool when working with colored pencils on Pastelmat.
After applying several layers of pigment, gently work the brush over the surface.
The bristles can help redistribute loose pigment within the texture, softening visible pencil strokes and encouraging colors to blend visually.
This technique can be especially helpful when creating smooth backgrounds or areas where you want a softer transition between colors.
The key is to use a gentle touch.
Aggressive brushing can remove pigment or disturb the surface, so experiment on a scrap piece of Pastelmat before trying it on an important drawing.
Different brushes will produce different results, so don't be afraid to experiment!
Can You Use Watercolor Under Colored Pencils on Pastelmat?
Absolutely! Pastelmat can accommodate carefully applied water-based underpaintings, making it an interesting surface for mixed-media colored pencil techniques.
A watercolor base layer can help establish large areas of color before you begin the more detailed work with colored pencils.
For example, imagine creating a landscape.
Rather than spending hours filling in a large blue sky with colored pencils, you could establish an initial wash of blue watercolor and then use colored pencils to develop the subtle variations, textures, and details.
This can save time and help establish a beautiful foundation for your drawing.
However, there are a few things to remember.
Use controlled amounts of water rather than soaking the surface. Allow the watercolor to dry completely before applying colored pencils, and test your materials first.
Pastelmat's coating behaves differently from traditional watercolor paper, so washes may not flow or absorb in quite the same way.
What About Gamsol and Colored Pencils?
Gamsol is an odorless mineral spirit that some colored pencil artists use to dissolve and blend the waxes and oils in colored pencil pigment.
It can create smooth transitions and reduce the appearance of individual pencil strokes.
While artists may experiment with Gamsol on Pastelmat, I recommend approaching this technique with caution.
Pastelmat has a specialized surface coating, and solvents may affect its texture or adhesive components. It can also flow underneath that fiber layer to places you may not want it to go… so go very lightly trying to keep the gamsol just on the surface.
Before using Gamsol on an important drawing, test a small sample of the same paper to see how the surface responds.
Also remember that odorless doesn't mean harmless. Follow the manufacturer's safety instructions, use appropriate ventilation, and avoid excessive solvent application.
Personally, I find that Pastelmat offers so many opportunities for dry blending and layering that solvents often aren't necessary.
The Real Secret to Pastelmat Is Patience
If there's one thing I hope you take away from this article, it's that Pastelmat rewards patience.
Its textured surface gives us the freedom to build colors gradually, adjust values, add highlights, and develop the depth that makes colored pencil artwork come alive.
You don't need to force the pigment into the paper with heavy pressure.
Instead, work with the surface.
Keep your pencils sharp, use a light touch, experiment with layering, and give yourself permission to build your colors slowly.
That's where the magic happens!
Ready to Try Pastelmat?
If you've been hesitant to try Pastelmat, I encourage you to give it a chance.
Start with a small drawing or a simple color study. Experiment with light layers, dark-to-light applications, and different blending techniques.
Pay attention to how the paper accepts pigment and how your colors change as you build additional layers. It’s a great way to discover color theory for yourself.
You may discover an entirely new way of working with colored pencils!
Happy layering!
Layering It Up — Where colored pencil creativity comes to life.
________________________________________
Have you tried Pastelmat? I'd love to hear about your experiences! What do you love about it, and what challenges have you encountered? Share your thoughts in the comments.